Learn how to choose the right off-road lighting setup for your truck or SUV. Compare LED, halogen, and HID options, beam patterns, and mounting strategies.
How to Choose the Right Off-Road Lighting Setup
If you’ve ever been out on a Colorado trail after dark, you know exactly how fast things can go sideways without proper lighting. One minute you’re cruising along, the next you’re squinting at shadows trying to figure out if that’s a rock, a rut, or just your imagination playing tricks. Stock headlights? They’re fine for paved roads around Centennial or Denver, but they weren’t designed for the kind of terrain we love to tackle out here.
At Jazz It Up Truck & Auto Accessories, we’ve helped countless truck and SUV owners from Aurora to Lone Tree figure out the right off-road lighting setup for their rigs. And here’s the thing: there’s no one-size-fits-all answer. The perfect setup depends on where you’re driving, how fast you’re going, and what kind of obstacles you’re dealing with. Let’s break down everything you need to know to make a smart choice.
Key Takeaways
- LED lights offer the best efficiency, longest lifespan, and brightest output, making them the top choice for most off-road lighting setups.
- Match your beam pattern to your driving style—spot beams for high-speed trails, flood beams for slow technical terrain, and combo beams for versatility.
- A strategic combination of a light bar plus ditch-mounted pod lights provides comprehensive 270-degree trail coverage for varying conditions.
- Proper wiring with correct gauge wire, relays, and fuses is essential for safe, reliable off-road lighting installation.
- Consider your typical speed when choosing lights: flood patterns work best under 15 MPH, while spot lights are critical at speeds over 50 MPH.
- Mounting location matters—roof mounts maximize visibility but add wind noise, while bumper mounts reduce glare but are more prone to damage.
Understanding Off-Road Lighting Types
Before you start shopping, it helps to understand what’s actually out there. Off-road lighting has come a long way from the days of bolting on a couple of KC Daylighters and calling it good. Today, you’ve got three main technologies to choose from: LED, halogen, and HID. Each has its place, though LED has pretty much taken over the market for good reason.
LEDs deliver brighter output while drawing less power and lasting longer than the alternatives. Halogen lights are cheaper upfront, but they’re energy hogs that produce less light for the watts they consume. HID (High-Intensity Discharge) lights fall somewhere in the middle. They’re brighter than halogens but less efficient than LEDs, and they’re more fragile to boot.
Beyond the technology, you’ll also need to think about the actual light form factor. Here’s where it gets interesting.
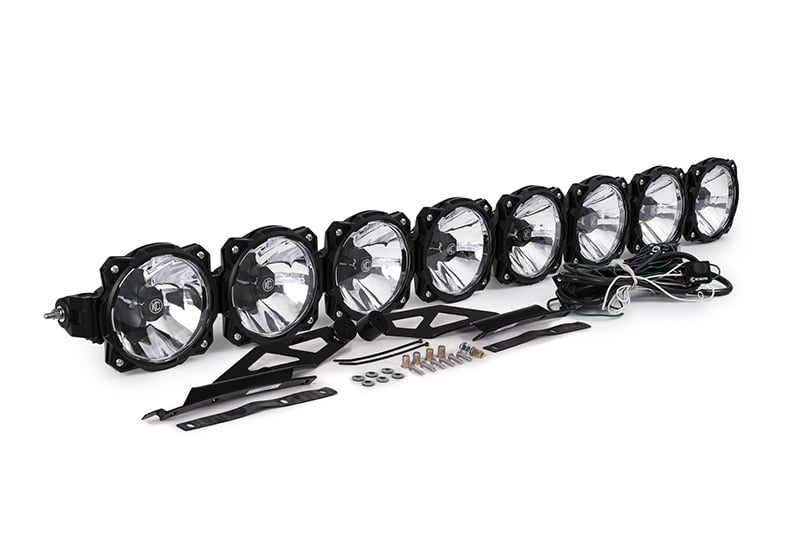
Light Bars
Light bars are the heavy hitters of off-road lighting. If you want maximum trail visibility and don’t mind making a statement, a quality light bar is hard to beat. These things mount across your roof, bumper, or grille and throw serious light down the trail.
The top-tier options are impressive. The Baja Designs OnX6+ 40″ pumps out nearly 40,000 lumens with IP69K waterproofing, meaning it can handle whatever Colorado weather throws at it. Rigid Industries’ E-Series Pro comes in sizes from 10 to 50 inches, delivering up to 31,680 lumens. And the KC HiLiTES Gravity Pro6 uses a modular design, so you can customize your coverage by adding or removing sections.
Light bars work best for higher-speed trail running where you need to see obstacles well ahead of your vehicle. They’re less ideal for slow rock crawling where you need more peripheral visibility.
Pod Lights and Spot Lights
Pod lights (sometimes called cube lights or auxiliary lights) are smaller, more versatile options that excel at filling in the gaps your light bar might miss. They’re perfect for close-range illumination and can be mounted in spots where a full light bar won’t fit.
The Baja Designs Squadron Pro is a popular choice, producing 4,900 lumens in a compact package. KC HiLiTES FLEX ERA 4 lights deliver even more at 7,912 lumens per light. And the Rigid D-Series Pro offers 3,168 lumens with your choice of spot, flood, or combo beam patterns.
Many off-roaders use pod lights as ditch lights, mounting them on their A-pillars or hood to illuminate the sides of the trail. That 270-degree coverage is clutch when you’re navigating tight switchbacks or trying to spot drop-offs.
Fog Lights and Flood Lights
Fog lights aren’t just for foggy conditions. They emit a wide, low beam pattern that cuts through haze, dust, and snow while reducing glare. If you’ve ever had your high beams reflect back at you in a dust cloud, you understand the value of proper fog lights.
Flood lights serve a different purpose. Their wide beam pattern provides excellent peripheral visibility at low speeds. When you’re picking your way through a boulder field at 5 MPH, flood lights help you see what’s on either side of your rig, not just what’s directly ahead.
Key Factors to Consider Before Buying
Walk into any shop and you’ll find dozens of off-road lighting options at wildly different price points. So how do you narrow it down? Start with these factors:
Budget: This is the obvious one. Quality LED lights aren’t cheap, but they last longer and perform better than budget options. Think of it as an investment in safety, not just an accessory purchase.
Light output: Measured in lumens, this tells you how bright the light actually is. More lumens generally means more visibility, but beam pattern matters just as much as raw output.
Physical size: Make sure whatever you’re buying will actually fit your vehicle. Measure twice, order once.
Beam pattern: We’ll dig into this more below, but the wrong beam pattern can actually make things worse, not better.
Your typical speeds: This one gets overlooked. If you’re mostly doing slow-speed rock crawling around trails outside Englewood or Aurora, your needs are completely different from someone running high-speed desert trails.
Here’s a rough guideline:
- Low speeds (0-15 MPH): Basic flood lighting works well for rock crawling and technical terrain
- Moderate speeds (15-50 MPH): You’ll want better efficiency and a mix of flood and spot patterns
- High speeds (50+ MPH): Invest in quality spot lights that throw light far down the trail
Power efficiency matters too, especially if you’re running multiple lights. LED lights draw fewer amps than alternatives and don’t require any warm-up time. That means less strain on your electrical system and instant-on capability when you need it.
Beam Patterns and Their Best Uses
Beam pattern might be the most misunderstood aspect of off-road lighting. People assume brighter is always better, but a super-bright light with the wrong beam pattern is basically useless.
Spot beams concentrate light into a narrow, focused pattern that reaches far down the trail. They’re optimized for distance, making them ideal for high-speed driving where you need to see obstacles well before you reach them. The downside? They don’t illuminate much on the sides.
Flood beams do the opposite. They spread light wide, covering a lot of area close to your vehicle. Perfect for slow-speed technical driving where you need to see rocks, ruts, and drop-offs on either side. Not great for seeing what’s a quarter-mile ahead.
Combo beams try to give you the best of both worlds, mixing spot and flood patterns in a single housing. They’re a solid choice if you’re only buying one set of lights and need versatility.
Driving beams fall between spot and combo, offering a good balance for moderate-speed trail running.
So what should you actually buy? Honestly, most serious off-roaders end up with a combination. A light bar with a combo or driving pattern for general trail visibility, plus pod lights with flood patterns mounted as ditch lights for technical sections. That setup covers pretty much everything you’ll encounter on Colorado trails.
Ditch lights deserve special mention here. Mounted on your A-pillars or hood, they’re angled outward to illuminate the sides of the trail. Quality ditch lights with a 270-degree pattern are absolute lifesavers when you’re trying to navigate tight spots or spot drop-offs that would be invisible with forward-facing lights alone.
LED vs Halogen vs HID: Comparing Technologies
Let’s settle the LED vs halogen vs HID debate once and for all. Spoiler: LED wins for most applications, but there are some nuances.
LED Lights
- Best overall efficiency (low amp draw, minimal heat)
- Longest lifespan (often 50,000+ hours)
- Instant on/off with no warm-up period
- Compact form factors allow for creative mounting
- Higher upfront cost, but better long-term value
HID Lights
- Excellent long-distance light output
- Self-defrost in cold conditions (nice for Colorado winters)
- Requires warm-up time to reach full brightness
- More fragile than LEDs
- Moderate efficiency
Halogen Lights
- Budget-friendly purchase price
- Widely available replacement bulbs
- Less efficient (more power for less light)
- Shorter lifespan
- Generates significant heat
For most truck and SUV owners in the Denver metro area, LED is the way to go. The technology has matured to the point where quality LED lights outperform the competition in almost every measurable category. The higher upfront cost pays off in durability, efficiency, and performance.
That said, if you’re on a tight budget and just need something functional, halogen lights will get the job done. They’re not fancy, but they work. And if you’re doing a lot of cold-weather off-roading and like the self-defrosting feature of HIDs, that’s a legitimate consideration.
Mounting Options and Placement Strategies
You’ve picked your lights. Now where do you put them? Mounting location affects both performance and aesthetics, and getting it wrong can actually create problems.
Roof mounts are popular for light bars because they provide maximum visibility and keep the light up above the dust your tires kick up. The trade-off is wind noise at highway speeds and potential clearance issues with garage doors or low branches. Roof-mounted lights also create more hood glare, which can be distracting.
Bumper mounts keep lights lower, reducing wind noise and glare. They’re easier to wire and less visible when not in use. But, lights mounted this low are more susceptible to damage from rocks and debris, and they can get covered in mud and dust pretty quickly.
Grille mounts work well for smaller lights and light bars. They’re protected somewhat by the grille itself and are easier to access for cleaning and adjustment.
A-pillar mounts are the go-to for ditch lights. This position angles lights outward to cover your blind spots. Most aftermarket A-pillar brackets are vehicle-specific, so make sure you’re getting the right ones for your truck or SUV.
Hood mounts are another option for ditch lights or pod lights. They keep the lights accessible and provide good coverage of the trail edges.
Here’s a tip: don’t go overboard. We’ve seen rigs with six light bars and a dozen pods, and honestly, past a certain point you’re just blinding yourself with reflected light and overwhelming your electrical system. A well-planned setup with quality lights in strategic locations will outperform a Christmas tree of cheap LEDs every time.
Wiring, Switches, and Power Requirements
This is where a lot of DIY installations go wrong. Off-road lights draw serious power, and proper wiring isn’t optional. It’s essential for safety and reliability.
Wire gauge matters. Undersized wire creates resistance, which generates heat and reduces the power reaching your lights. For most off-road lighting setups, 14-gauge wire works for shorter runs to smaller lights, while 10 or 12-gauge is better for light bars and longer wire runs. When in doubt, go thicker.
Relays protect your switches. Rather than running high-amperage current through your dash switch, a relay lets you use a low-amp switch to trigger a higher-amp circuit. This keeps your switches from melting and your wiring from catching fire.
Fuses are non-negotiable. Every circuit should be fused appropriately. If something shorts out, you want a $2 fuse to blow rather than your wiring harness going up in smoke.
Switch placement comes down to personal preference and practicality. Many folks like rocker switches mounted in an unused dash blank or on an overhead console. Others prefer a dedicated switch panel. Just make sure you can reach your switches easily while driving and that they’re clearly labeled.
Total amp draw is something you need to calculate before you start adding lights. Your alternator can only produce so much power, and your battery can only store so much. A typical setup with a 40-inch light bar and a couple of pod lights might draw 20-30 amps. That’s manageable for most stock electrical systems, but if you’re running multiple light bars plus a winch plus a fridge, you might need to upgrade your alternator or add a secondary battery.
Honestly, unless you’re comfortable with automotive electrical work, professional installation is worth the money. At Jazz It Up Truck & Auto Accessories, we handle wiring and installation for all the lighting systems we sell. Getting it done right the first time means you’re not troubleshooting electrical gremlins on the trail.
Conclusion
Choosing the right off-road lighting setup comes down to understanding your needs and matching the right lights to how you actually use your vehicle. Someone running technical trails at night around Lone Tree needs different lighting than someone bombing across open desert. There’s no universal answer, but there are smart choices based on your specific situation.
Start with the basics: what kind of terrain do you typically tackle, how fast do you travel, and what’s your budget? From there, you can narrow down the technology (LED for most people), the form factor (light bar, pods, or a combination), and the beam patterns that make sense for your driving style.
If you’re in Centennial, Denver, Aurora, Englewood, or Lone Tree and want help figuring out the best off-road lighting setup for your truck or SUV, come see us at Jazz It Up Truck & Auto Accessories. Our team knows this stuff inside and out, and we offer expert installation to make sure everything is wired correctly and mounted securely. Stop by, tell us how you use your rig, and we’ll help you build a lighting setup that actually makes sense for your adventures.
Frequently Asked Questions
What is the best off-road lighting setup for rock crawling?
For rock crawling, flood lights and pod lights work best because they provide wide, close-range illumination. Mount ditch lights on your A-pillars for 270-degree coverage, helping you spot drop-offs and obstacles on either side of your vehicle during slow-speed technical driving.
How do I choose between LED, halogen, and HID off-road lights?
LED lights are the best choice for most off-road lighting setups. They offer superior efficiency, 50,000+ hour lifespans, instant-on capability, and brighter output. Halogen is budget-friendly but less efficient, while HID provides good distance but requires warm-up time and is more fragile.
What beam pattern should I use for off-road driving?
Your beam pattern depends on driving speed. Use flood beams for slow technical terrain, spot beams for high-speed trails where you need long-distance visibility, and combo beams for versatility. Most serious off-roaders combine a light bar with combo pattern plus flood-pattern ditch lights.
Where is the best place to mount off-road lights on a truck?
Roof mounts provide maximum visibility but add wind noise. Bumper mounts reduce glare and are easier to wire. A-pillar mounts are ideal for ditch lights to cover blind spots. Choose based on your priorities—a strategic combination of locations often outperforms overloading one area.
How many lumens do I need for off-road lights?
Lumen requirements vary by use. Pod lights typically range from 3,000–8,000 lumens each, while quality light bars can produce 30,000–40,000 lumens. Focus on matching beam pattern to your driving style rather than just maximum brightness, as the wrong pattern wastes light output.
Do I need to upgrade my electrical system for off-road lights?
Most stock electrical systems can handle a typical off-road lighting setup drawing 20–30 amps. However, if you’re running multiple light bars plus accessories like a winch or fridge, consider upgrading your alternator or adding a secondary battery to avoid overloading your system.